Skip to content

  • Home
  • Subscribe / donate
  • Events calendar
  • News
    • Local
    • National
    • Israel
    • World
    • עניין בחדשות
      A roundup of news in Canada and further afield, in Hebrew.
  • Opinion
    • From the JI
    • Op-Ed
  • Arts & Culture
    • Performing Arts
    • Music
    • Books
    • Visual Arts
    • TV & Film
  • Life
    • Celebrating the Holidays
    • Travel
    • The Daily Snooze
      Cartoons by Jacob Samuel
    • Mystery Photo
      Help the JI and JMABC fill in the gaps in our archives.
  • Community Links
    • Organizations, Etc.
    • Other News Sources & Blogs
    • Business Directory
  • FAQ
  • JI Chai Celebration
  • JI@88! video
Scribe Quarterly arrives - big box

Search

Follow @JewishIndie

Recent Posts

  • Don’t miss Jewish film fest
  • A wordless language
  • It’s important to vote
  • Flying camels still don’t exist
  • Productive collaboration
  • Candidates share views
  • Art Vancouver underway
  • Guns & Moses to thrill at VJFF 
  • Spark honours Siegels
  • An almost great movie 
  • 20 years on Willow Street
  • Students are resilient
  • Reinvigorating Peretz
  • Different kind of seder
  • Beckman gets his third FU
  • הדמוקרטיה בישראל נחלשת בזמן שהציבור אדיש
  • Healing from trauma of Oct. 7
  • Film Fest starts soon
  • Test of Bill 22 a failure
  • War is also fought in words
  • Pondering peace post-Oct. 7
  • Birthday musings on mitzvot
  • Drama teacher back on stage
  • Scribe camp issue launches
  • Carousel stages Stuart Little
  • Flowers for those murdered
  • Preparing for election
  • Left returns to City Hall
  • Bregmans’ invaluable impact
  • Meet new director of JACS
  • Video shares Spiers’ legacy
  • Women’s leadership summit
  • New draw to Ben-Gurion site
  • Hebrew U marks 100
  • A theme of “Am Israel Run”
  • Ruchot Hatzafon headlines

Archives

Tag: Curly Orli

An artist in multiple realms

An artist in multiple realms

Lana Shahar-Kulik (back right) with some of her skating students. (photo from Lana Shahar-Kulik)

Lana Shahar-Kulik approaches life creatively. “In any situation, I like to imagine, What else could I do? How could I make it more interesting? And then I make my imagination a reality,” she said in an interview with the Independent.

Since she was 6 years old, she wanted to be a teacher, and she became one. She taught elementary school for several years in her native Riga, Latvia, before immigrating to Israel in 1998. Her professional life took an unexpected detour there, as she explored a different facet of her exuberant personality.

“I could become a teacher again but I wanted to try something different. I took classes in accounting but, after a couple weeks, I was so bored I wanted to scream. Numbers all day long. Then, our instructor introduced us to new software and told us to create an image with it. Most of my classmates drew some tools; I drew a dog. I enjoyed tinkering with the program. My instructor looked at my dog and said, ‘What are you doing here? You should study art.’”

That was the end of her accounting career. She enrolled in design college in Tel Aviv and spent four intensive years studying graphic design and visual communications.

“I always drew when I was young, but my parents – they were engineers – and I considered it a hobby. Only in Israel art became my profession. I loved it. It was what I wanted to do. I felt almost ecstatic with happiness. I could talk to people who thought like I did, who loved and understood art the way I did. I found my niche.”

Her teacher’s training helped her – she taught art at community centres to pay her college tuition. Afterward, she tried different areas of graphic design. She worked for the fashion industry and in marketing. “But I always wanted to create a book,” she recalled.

That dream didn’t materialize until she moved to Canada with her husband and baby daughter. In 2008, they settled in Vancouver.

“My husband went to work right away – he is a computer guy – but I stayed at home. My daughter was only months old, so we walked outside a lot. That was when I wrote a picture book about a young girl having adventures in Vancouver.”

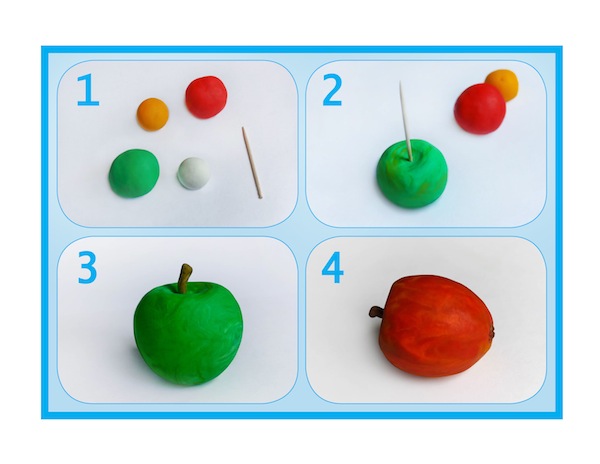
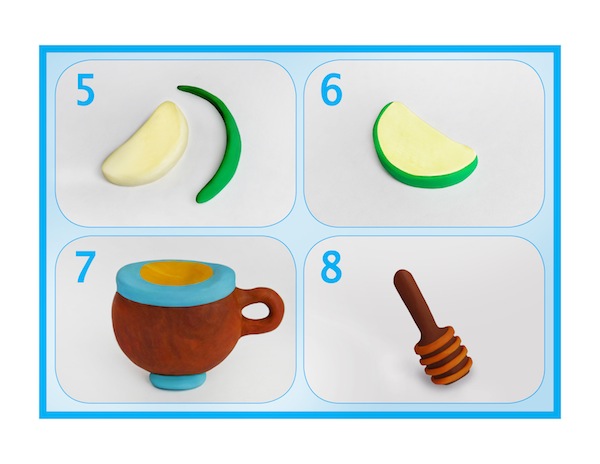
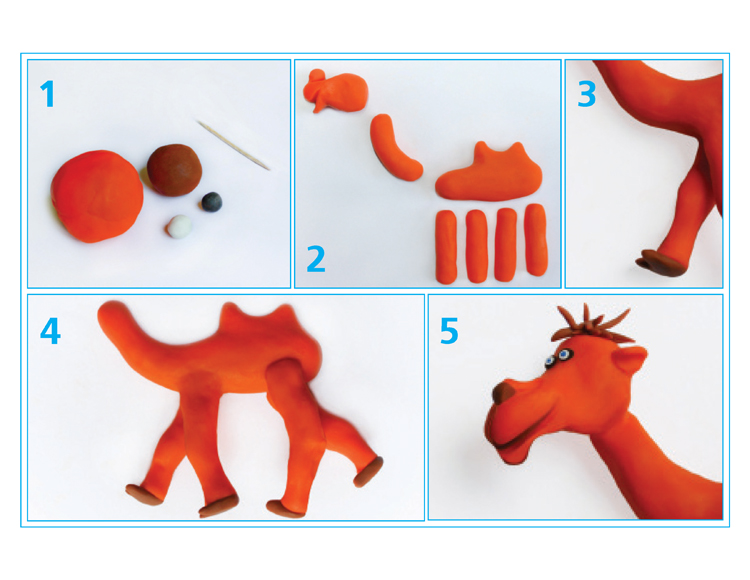
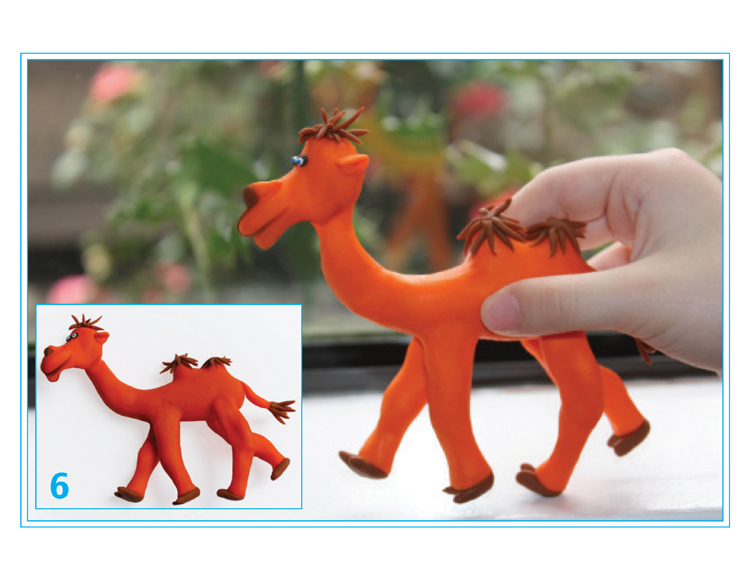
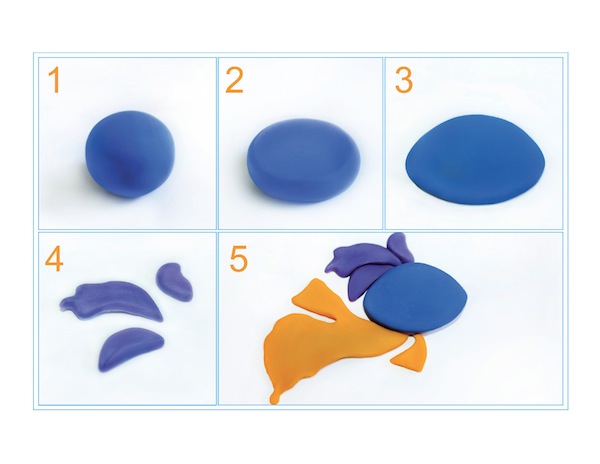
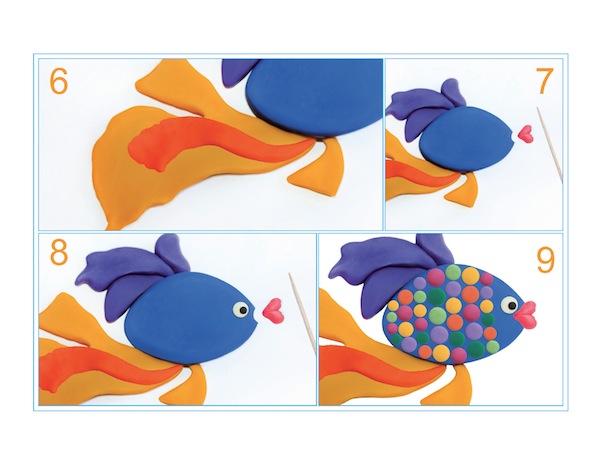
Her picture book, Curly Orli Goes to Vancouver, by Lana Lagoonca, Shahar-Kulik’s pen name, was published in 2011. She subtitled the book “Plasticine Adventures,” because she originally created all the illustrations as colorful plasticine sculptures. Later, she hired a photographer to photograph her tiny sculptures and used those photos as the book’s images. (For more on Curly Orli and Lagoonca, click here.)

The book opened up a new and fascinating avenue for Shahar-Kulik: brand merchandising. Key chains, jigsaw puzzles, greeting cards, T-shirts and other objects featuring the images from her book are available at curlyorli.com and at several gift shops in Vancouver. She also offers workshops in plasticine and Play-Doh for children of different ages. “I plan to write more books about the same girl, Curly Orli, traveling to different cities, if only I had more time,” she said.

Shahar-Kulik’s love for Vancouver also motivated her to create an adult equivalent of the book – a blog about Vancouver in Russian for tourists and newcomers (lagoonca.livejournal.com).

“I haven’t updated this blog in years, no time, but people still write to me and ask me questions. I always reply, always try to help,” she said.

Helping clients with their graphic design needs, from websites to fashion catalogues, is what Shahar-Kulik’s company, Lunart (lunart.ca), does in four languages: English, Russian, Hebrew and Latvian.

Despite a very busy schedule, Shahar-Kulik recently added another activity to her portfolio. She has started teaching again – roller skating, where the skates have two rows of wheels (quads), and inline skating, where the skates have one set of wheels.

“I loved ice skating as a kid,” she said. “We had a big puddle in our yard and, in winter, it iced over. That’s where I learned to skate. When we came to Tel Aviv, there is no ice there, but there is a large and free outdoor rink for inline skating. I loved it. I learned to do tricks, danced on skates, even had a partner. It is another outlet for my creativity. Skating is like art on wheels. You create beauty with your feet.”

Shahar-Kulik started skating here when her daughter started day care.

“I discovered that Vancouver had no special rinks for roller and inline skating; not many lessons either, and most of them just technical. Nobody offered lessons in creative skating.”

She persevered, met other skating enthusiasts and learned about quad skating. When, in 2015, American skating firm Skate Journeys brought their summer camp to Vancouver, she enrolled and received a licence to be a skating instructor. She also participated in the American 2015 national championship for inline and roller skaters and finished fifth overall.

“I was ready to teach skating,” she said. “Of course, I taught it before, gave private and group lessons, but now I opened a school at Richmond Sports and Fitness. It is called Roller Dance Owl. We teach group dancing, slalom, pair dancing, technical elements and, of course, safe street skating. We play on wheels, have field trips, and the children love it.”

Roller Dance Owl has its own Facebook page, facebook.com/rollerdanceowl.

Olga Livshin is a Vancouver freelance writer. She can be reached at olgagodim@gmail.com.

Format ImagePosted on June 24, 2016June 22, 2016Author Olga LivshinCategories LocalTags Curly Orli, inline skating, Lagoonca, Roller Owl, roller skating, Shahar-Kulik
Make the New Year sweeter

Make the New Year sweeter

Apples and honey are essential at Rosh Hashana’s festive table. An old tradition of eating apples dipped in honey reflects our hopes for “sweet” and prosperous New Year. Shall we try and make this treat together?

image - 1. Take a toothpick and a few pieces of modeling clay (or Plasticine) in green, yellow, red and white colors. 2. Mix well a piece of green and a small amount of yellow modeling clay. Make a ball out of this mixture and, using the toothpick, make a hole in the bottom of the ball. 3. Next, you can make a stem for your apple by sticking a small brown piece of clay in the hole that you made. Your apple is ready! 4. Mix well a piece of red modeling clay and a small amount of yellow. Follow the procedure in Step 2 and make a red apple. Don’t forget about giving your apple a “tail” and a “nose” using brown clay. 5. It is time to make some apple slices. Take white modeling clay and mix it with yellow. Shape the mixture into a crescent. Make the skin of an apple from green modeling clay. 6. Combine the crescent shape with the skin and your apple slice is ready. Make a few such slices. 7. We still need to make a pot of honey. For that, we use brown and blue modeling clay. First, make a brown pot, and then add a blue rim to it. Also attach a little handle to the side of your pot. “Fill” your pot with honey by putting a little oval made from yellow modeling clay on top. 8. Now we only need to make a dipper. Take brown modeling clay and roll it into a stick shape. It has to be thinner on one end and wider on another, resembling a hammer. To create the illusion of carving, typical for a dipper, encircle the wide part of it with few horizontal stripes made from orange clay. Steps 1-41. Take a toothpick and a few pieces of modeling clay (or Plasticine) in green, yellow, red and white colors.

2. Mix well a piece of green and a small amount of yellow modeling clay. Make a ball out of this mixture and, using the toothpick, make a hole in the bottom of the ball.

3. Next, you can make a stem for your apple by sticking a small brown piece of clay in the hole that you made. Your apple is ready!

4. Mix well a piece of red modeling clay and a small amount of yellow. Follow the procedure in Step 2 and make a red apple. Don’t forget about giving your apple a “tail” and a “nose” using brown clay.

image - 1. Take a toothpick and a few pieces of modeling clay (or Plasticine) in green, yellow, red and white colors. 2. Mix well a piece of green and a small amount of yellow modeling clay. Make a ball out of this mixture and, using the toothpick, make a hole in the bottom of the ball. 3. Next, you can make a stem for your apple by sticking a small brown piece of clay in the hole that you made. Your apple is ready! 4. Mix well a piece of red modeling clay and a small amount of yellow. Follow the procedure in Step 2 and make a red apple. Don’t forget about giving your apple a “tail” and a “nose” using brown clay. 5. It is time to make some apple slices. Take white modeling clay and mix it with yellow. Shape the mixture into a crescent. Make the skin of an apple from green modeling clay. 6. Combine the crescent shape with the skin and your apple slice is ready. Make a few such slices. 7. We still need to make a pot of honey. For that, we use brown and blue modeling clay. First, make a brown pot, and then add a blue rim to it. Also attach a little handle to the side of your pot. “Fill” your pot with honey by putting a little oval made from yellow modeling clay on top. 8. Now we only need to make a dipper. Take brown modeling clay and roll it into a stick shape. It has to be thinner on one end and wider on another, resembling a hammer. To create the illusion of carving, typical for a dipper, encircle the wide part of it with few horizontal stripes made from orange clay. Steps 5-85. It is time to make some apple slices. Take white modeling clay and mix it with yellow. Shape the mixture into a crescent. Make the skin of an apple from green modeling clay.

6. Combine the crescent shape with the skin and your apple slice is ready. Make a few such slices.

7. We still need to make a pot of honey. For that, we use brown and blue modeling clay. First, make a brown pot, and then add a blue rim to it. Also attach a little handle to the side of your pot. “Fill” your pot with honey by putting a little oval made from yellow modeling clay on top.

8. Now we only need to make a dipper. Take brown modeling clay and roll it into a stick shape. It has to be thinner on one end and wider on another, resembling a hammer. To create the illusion of carving, typical for a dipper, encircle the wide part of it with few horizontal stripes made from orange clay.

Remember, you can use the toothpick to refine all your pieces of art. As well, before you start working with a new color, wipe your hands with a napkin to prevent the unwanted mixing of colors. And, most important of all – use your imagination! There are no strict rules when it comes to creativity. Don’t be afraid to experiment with colors.

Once you’ve finished your creations, if you put together all the pieces that you have made and take a picture, you will have a wonderful and unique Rosh Hashana greeting card.

Sweet and prosperous Rosh Hashana wishes to all the artists and all the Jewish Independent readers!

Lana Lagoonca is a graphic designer, author and illustrator. At curlyorli.com, there are more free lessons, along with information about Curly Orli merchandise.

Format ImagePosted on September 11, 2015September 9, 2015Author Lana LagooncaCategories Celebrating the HolidaysTags Curly Orli, Plasticine, Rosh Hashana
Create your own clay camel

Create your own clay camel

How fast time flies. Passover is almost here again, and it’s time to prepare a new tutorial, I said to my 7-year-old daughter while getting out a magic box with colorful modeling clay.

At school, we are reading a lot about Passover right now, she said to me. When the Jewish people crossed the dessert, they had camels with them, who carried people and their belongings. Mom, can you teach me how to model a baby camel? Please, mom, can you?

Of course I can, my dear. Come over here, I said, inviting my daughter to join me at the table to work on the model of a baby camel. For the young readers of Jewish Independent, as always, I have prepared pictures to demonstrate the process. Find yourself a comfortable seat and start working on your creation!

image - Clay camel by Lana Lagoonca, steps 1-51. Take a few pieces of modeling clay and a toothpick. Mostly we will work with orange color, but we will also use some brown, white and black pieces.

2. Prepare equal amounts of clay to form the baby camel’s head, neck, body with two humps and four legs.

3-4. Bend the legs a little in the middle and finish them with brown cushion-like hooves, perhaps parted in the middle front. Connect the neck, body and hooves.

5. For the head, you can use white and black pieces of clay for the eyes. Or blue or green clay, if you have it. Take some brown clay and shape the nose and also give your camel a tuft of hair on top of its head.

6. Cover the tips of the humps and tail with tufts of hair as well. We have made our baby camel! You can now take your new little friend for a walk.

image - Clay camel by Lana Lagoonca - taking it for a walkIsn’t it great to make toys with your own hands? You will also make your family happy by adding your creation to the Passover seder table. If you take a picture of your baby camel and print it, you will have a real postcard.

Let your imagination guide you and join our art lab! Send photos of your artwork to curlyorli@gmail.com, and you may have a chance to win Curly Orli Goes to Vancouver, a book illustrated with clay pictures.

Wishing you a kosher and happy Pesach, dear friends! See you next time.

Lana Lagoonca is a graphic designer, author and illustrator. At curlyorli.com, there are more free lessons, along with information about Curly Orli merchandise.


Format ImagePosted on March 27, 2015March 26, 2015Author Lana LagooncaCategories Celebrating the HolidaysTags camel, Curly Orli, Passover, seder
Make a fish for Rosh Hashanah

Make a fish for Rosh Hashanah

Fish is a traditional part of the Rosh Hashanah meal. Since Rosh Hashanah translates literally as “Head of the Year,” some people will eat the head of a fish as part of the holiday meal, or at least have one on their holiday table. Fish is also a symbol of fertility and prosperity.

Today, we will make a beautiful fish from Plasticine. While you won’t be able to eat it, you can add it to the table with other symbols of the holiday.

For this art project, you will need various colors of Plasticine or Play Doh.

image - Plasticine fish steps 1-51. First, we make the body of the fish. Roll a small ball from blue Plasticine.

2. Flatten the ball with the palm of your hand and flip onto the other side.

3. With the tip of your fingers, gently raise the edges on both sides.

4. Now make a top fin. You will need three small pieces of dark blue or purple Plasticine. Using a toothpick, attach the top fin to the body of the fish.

5. Use yellow Plasticine to make a bottom fin.

image - Plasticine fish steps 6-96. Add an orange fin on top of the yellow one.

7. With the help of a toothpick, make an indent for the mouth. Later, using pink Plasticine, create heart-shaped lips. Attach the lips to the body.

8. Using white and black Plasticine assemble an eye, and add it to what you’ve already put together.

9. Our fish is almost ready! We just need to add scales. Make a small green ball and flatten it. Add this newly formed circle to the body. Now, create many of these circles and decorate your fish with beautiful and colorful scales.

Instead of circles, you may create stripes or any other unique designs – and, of course, you can use any colors you want for any part of your fish. Art is a soul’s expression. Imagine, inspire, innovate!

Happy New Year to all young readers and their parents! Curly Orli and I wish you a year full of happiness and joy!

Lana Lagoonca is a graphic designer, author and illustrator. At curlyorli.com, there are more free lessons, along with information about Curly Orli merchandise.

Format ImagePosted on September 19, 2014September 18, 2014Author Lana LagooncaCategories Celebrating the HolidaysTags Curly Orli, Plasticine, Play Doh, Rosh Hashanah
Proudly powered by WordPress